


If you're wondering why the changes you've made with Tailwind utility classes aren't showing up in your website, let's explore some possible reasons. But first, let's make sure we're on the same page about what utility classes are and how to use them. If you're already familiar with this, feel free to skip ahead to the next section :)
Utility classes:
Utility classes are small, single-purpose CSS classes that provide specific styling properties. They're designed to solve common styling needs efficiently by applying predefined styles directly to HTML elements. Utility classes in frameworks like Tailwind CSS offer a wide range of ready-to-use styles for tasks such as layout, typography, spacing, and more.
Insted of creating a special file for your Css, you can directly add CSS to your HTML/REACT code :D

Debugging :
- Firstly, ensure that you have installed Tailwind CSS in your application project by executing the following command:
npm install tailwindcss
If you're using Yarn, you can use:
yarn add tailwindcss
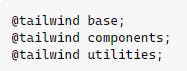
Ensure that you've imported TAIWLIND CSS into your project: (css file)
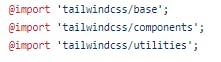
or
- Ensure that you’ve installed Autoprefixer and postCSS alongside Tailwind :
Simply installing Tailwind CSS won't be enough; you also need Autoprefixer and PostCSS. Autoprefixer takes care of vendor prefixes automatically, while PostCSS handles various CSS transformations and ensures compatibility across different browsers. Using both together greatly streamlines your development process. Here's how to include them in your project if you missed doing so initially.
Install alongside tailwind:
npm install -D tailwindcss postcss autoprefixer
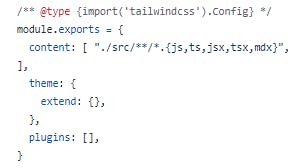
- When you initialize Tailwind installation, it creates two essential configuration files:
tailwind.config.jsandpostcss.config.js. These files are crucial as Tailwind relies on them to locate utility classes in your project. Without them, your utility classes won't function correctly. Here's how to start the initialization process:
npx tailwindcss init -p
Tailwind.config.js looks like :
Ensure that your classes are error-free. While it may seem obvious, overlooking small spelling mistakes can disrupt your code's functionality. Additionally, double-check if you're using any deprecated classes from previous versions of Tailwind. Confirm their current status by consulting the Tailwind documentation.
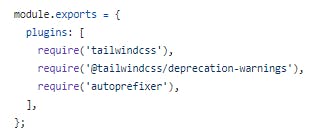
You can easily identify deprecated classes by searching for the keyword "Deprecated" in the documentation. You can utilize Tailwind's deprecation warning plugin along with PostCSS configuration to receive alerts before finalizing your code.
To implement this, use the following command:
npm install @tailwindcss/deprecation-warnings --save-dev.Configure your PostCSS configuration file:
By following the steps outlined in this guide, you can effectively troubleshoot Tailwind CSS errors and restore functionality to your utility classes. Whether you're checking your configuration file and dependencies or simply reviewing your code for misspelled classes, there are various strategies you can employ to identify and fix the issue. And don't forget, when in doubt, consulting the documentation is always a good idea :)
Happy coding 🎈 🌼